Written by Samantha Day, 577 Organic Garden Horticulturist
Part of our daily mantra at 577 is to experiment: try something new – maybe it works, maybe it doesn’t, but we’ll always learn something. I started with The 577 Foundation last Fall, and I’ve been excited to be allowed the space and support to start experimenting with something that I’ve been looking into for a long time: cultivating culinary mushrooms.
In general, there are several ways you can grow your own culinary mushrooms. You can generally grow mushrooms on logs, on straw, on sawdust, in compost, on “lasagna” beds of sticks and grass clippings, and on woodchips. Each type of cultivated mushroom has a desired environment in which it thrives, so it takes some research to find out which mushrooms will grow on which logs, or if they don’t grow on wood they grow on compost, or in which season you should inoculate the prepared environment. Beyond the established, tried and true cultivation methods, people are experimenting with growing mushrooms in garden soil, on cardboard, on partly living-partly rotting trees, etc.
The fungi kingdom is ancient, adaptable, and everywhere. Our facilitation of certain species of fungi’s success in environments that provide us with food or medicine probably isn’t even a novel concept and is certainly a sensible way to work with nature. In January 2023, I started where most beginner mushroom growers start ~ with oyster mushrooms grown on straw in bags.
I will preface describing this experiment by telling you that I already tried and failed at this project once. My hope is to illustrate that this project, like so many others, is not a project you should approach feeling like you need some sort of special expertise to carry out. I am no expert. I am fumbling around trying to do things correctly myself, and I didn’t really have that much additional insight between failing the first time and succeeding the second time. You don’t need expertise to grow organic mushrooms in your home, garden, or backyard.


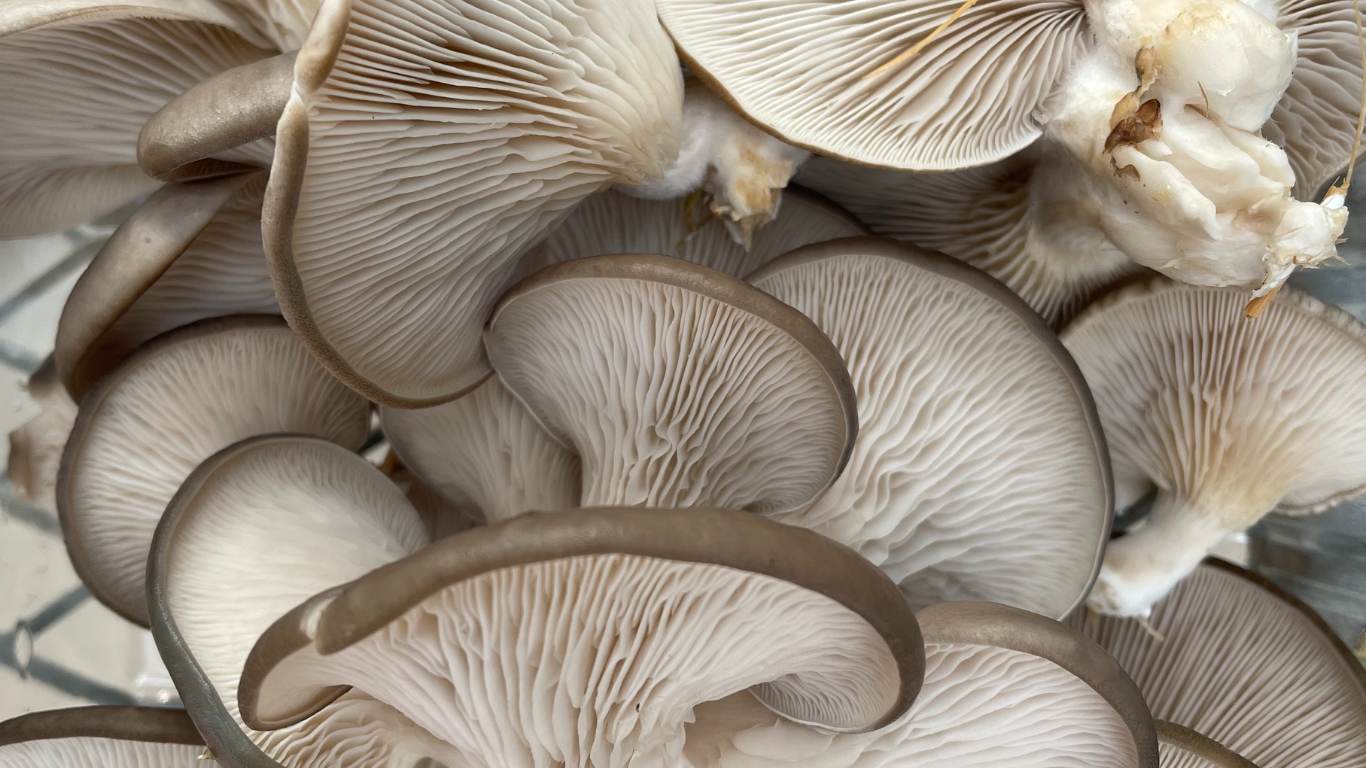
My first attempt was with Grey Dove oyster mushrooms on straw. The basic process is to chop up straw, sterilize it overnight in pickling lime (food grade Calcium Hydroxide) water at pH 12, drain the straw, stuff the straw and grain spawn into bags or buckets, and let the spawn colonize the straw for a period at 70-75F in a dark, humid environment. Once the straw is colonized, you move the bags or buckets to a location where they can have lots of fresh oxygen, still high humidity, and diffuse light at 50 to 65F. That change in temperature, oxygen level, and additional light triggers the mycelium to fruit, and thus you harvest the fruiting bodies for a few months as they come up.
My husband and I tried this when we lived in Denver a few years ago. We did well up until the fruiting stage, but then we missed something. It was so hard to keep the humidity up in our basement in that ultra-dry climate. Our solution was to keep the oysters under a little plastic tent thingy we made. The oysters started “pinning” or showing little clusters ready to fruit, but then they’d fail and shrivel up. At first, we didn’t understand why. Later, after we had already abandoned the experiment, we learned about the “fresh oxygen” bit. We realized our intended humidity tent was keeping a high CO2 environment that the fruiting bodies couldn’t handle.
Fast forward to this go-around. We chopped the straw, sterilized it with pickling lime overnight ($5 worth on Amazon), packed the fruiting bags ($5 from Field and Forest) with straw and Grey Dove oyster grain spawn ($21 from Field & Forest), and put the bags in the dark, warm furnace room in the basement of Virginia’s House for four weeks.


We certainly did not have to worry about the humidity level this time, Northwest Ohio is its own homemade humidity tent. I moved the bags to the greenhouse after the four weeks were up (it may not take this long to colonize in warmer seasons, or maybe I didn’t even need to let them colonize this long…), and the shock from the temperature drop to 55F and added light in the greenhouse triggered them to fruit!
The first flush of fruiting was the largest by far, and created about 6 lbs of mushrooms. After that, the bags would take turns fruiting out of one or two holes rotating each week, so I probably harvested another pound of mushrooms each week for 6 to 7 weeks. Then they were really slowing down and fruiting sporadically, with a flush happening once every two weeks. At one point, the straw seemed to dry out. So, I ended up plugging the sink and dunking the bag in water to soak. Overall it didn’t seem to really impact the production.


I’ve already learned some things that I would change for next time. For one, I personally did not like growing in the plastic bags. They tended to shift slightly if you moved them which sometimes resulted in the pre-cut holes not lining up with the pinning spots anymore. Also, there’s the waste aspect. I’d rather use the 5-gallon bucket method so that we can keep reusing the buckets and not throw away bags. I have noticed that the bags flush mushrooms quickly and heavily after we’ve had a stretch of a few warm days, but they don’t fruit super strongly when its cloudy and chilly. Our greenhouse temp was set at 52-58F, and even though the Grey Dove strain we’re using can fruit from 45-65F, I think it might have preferred the higher end of that range in order to put out really robust flushes.
On to the next experiments….
After my initial experiment with Grey Dove, I have already started several other mushroom projects. These trials are not as quick and in fact have long returns. First, I put Lion’s Mane plugs into logs of a mulberry tree we took down last winter, which we may not see fruits from that for up to 2 years. Then I tried Shiitake plugs in the logs of a large oak branch that we took down in March, which mostly likely will fruit next Spring. I made a 5” deep bed of compost in a shady area at the back of the property and put Almond Agaricus spawn in. For this experiment, I should actually see mushrooms starting in a month or so, and the mycelium will fruit all summer until the first freeze and then die.
Next I put morel pegs into the soil beneath two elm trees just behind our nature play area. Morel’s thus far have not been reliably cultivated, but this strain that I’m trying seems to form associations with the roots of elm, ash, and apple trees. If it works, we may have some morels next Spring. When the oyster bags were finished producing, I made wood chip beds and mixed the myceliated straw with them in a shady, damp area at the back of the property. I have no idea if it’s going to work, but my thought was that the mycelium could spread into the wood chips through the warm season, and potentially fruit when the temperature drops again this fall. We’ll see!


Mushroom cultivation is exciting to me for several reasons. For one, it takes a little bit of cost input for a high amount of output. I was able to harvest about 6 lbs. of organic oyster mushrooms from the first flush from those bags. I think if you were to go to a health food store and purchase 6 lbs. of organic oyster mushrooms, if they even carry them, it would cost a whole lot more than the $30 it took to set up that project. And that was only the first flush! I also love to cook mushrooms as a meat substitute with my family these days. We have quit red meat entirely, and in its place we use mushrooms for grilled sandwiches, for spaghetti, and in stir-fries.
Mushrooms have tons of medicinal benefits beyond being delicious. Oyster mushrooms have beneficial effects for immune health and blood-sugar regulation. Lion’s Mane mushrooms are essentially brain food. Shiitake mushrooms are anti-inflammatory and support cell repair. And there are so many more types of mushrooms to grow, taste, and admire for their delicate structures and textures. They really are so beautiful.
I look forward to all our mushroom experiments to come, whether they’re successful or not. Are you ready to jump on the mushroom bandwagon?


